Random Posts

new Download Our Android App -http://www.datafilehost.com/d/85f0c06aHERE
DamiTechs%2Bflashing You Wanna Own A Blog Like This?
For Questions, Inquiries, Click Here
fb Page | Group - twitterButton Follow us - call%2Bicon Call us -  - blogger Hire Us

Monday 26 June 2017

How To Recover Deleted Files, Photos And Videos On Android

How To Recover Deleted Files, Photos And Videos On Android


If perhaps you've accidentally deleted your files, photos, videos, documents and music, then DiskDrigger android app can help you recover them with or without root access.

Everyone has his or her own mistake to share from experience, there isn't a day that passes by that we do not make mistake. However fixing those mistakes is actually your priority once you've got your brains back. Now as an android user, there's a huge possibility that you've mistakenly deleted your files, photos, videos and music due to reasons best known to you. Perhaps the unthinkable happened and boom! You mistakenly hit the delete button without thinking twice or realising it. Well just as it's been quoted, every problem has it's own solution and that's why we're here today.
Also Read: How To Hide Files, Photos and Videos Inside a Calculator on Android.
DiskDigger can undelete and recover lost videos, documents, music and images from your memory card or internal memory. Rooting is not necessary to use this app. Whether you accidentally deleted a photo, or even reformatted your memory card, DiskDigger's powerful data recovery features can find your lost pictures and let you restore them. The Pro version of the app can painlessly allow you to recover your deleted files too. You can upload your recovered files directly to Google Drive, Dropbox, or send them via email. The app also gives you the option to save the recovered files to a different local folder on your device.

How To Recover Deleted Files With DiskDrigger

DiskDigger can actually be considered as a life saver, recently a friend of mine deleted one of my stuff which was actually of great importance. Thus having discovered this app, I was amazed at how it painlessly retrieved all my deleted stuffs without any hassle. To begin with,  navigate to the Google playstore and install DiskDrigger. 


Now once the installation is complete, locate and open the app from your device app drawer. On the app first launch, you've to choose between a "Full scan" or "Basic Scan". The full scan is strictly for rooted android users while the basic scan can be performed on non-rooted. If your device is rooted, DiskDigger should ask you to specify which memory partition it should scan.


Upon a successful scan, DiskDrigger will unveil the files it has found so far. Now you will be presented with numerous photos, videos or files you've mistakenly deleted. You can tap each file to select them, or use the 3 dots at the upper right hand corner of the app to select all photos. Now once you're done, tap the recover button.


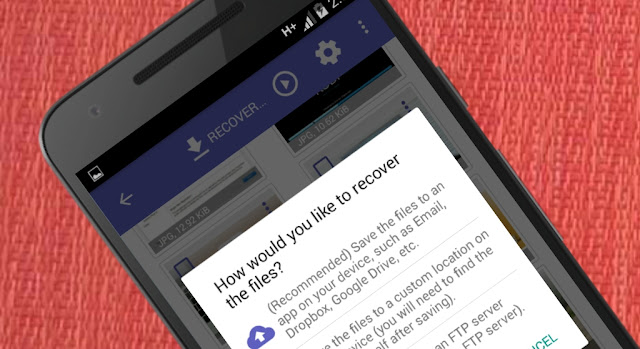
DiskDrigger will unveil three different options or choice you can make. The first should be an option to save the selected files to an app on your device such as dropbox, Google drive, email etc. The second option will prompt you to save the file to a custom location on your device (I.e to save the files locally on your internal or external SD card). While the third option will be prompting you to upload the selected files to FTP server. Thus it's actually your choice to make since you know what suits you best.


Also DiskDrigger can do a great job by giving you the opportunity to upload your recovered files directly to Google Drive etc. or even send them via email. The app also allows you to upload the files to an FTP server, or save them to a different local folder on your device as stated earlier on. While using DiskDigger you won't have to worry what type of file you've lost as the app can painlessly recover the following types of files: JPG, PNG, MP4 / M4A / 3GP / MOV, GIF, MP3 etc. Also you can search any type of files manually and the results will automatically be presented.

Final Words

DiskDigger is a promising app and also a life saver, however it seems most of the advanced features of this app will be great for rooted android users. While on a non-rooted device, the app can only recover lower-resolution versions of your photos that it finds in your device's cache and thumbnail directories. Overall it's the best app that can retrieve all your deleted photos, files, images, music, videos, documents without any hassle.
How To Convert User Apps To System Apps On Android

How To Convert User Apps To System Apps On Android


The best way to install or convert user apps like pixel launcher to system apps on android.

Every android phone comes with certain apps that helps to perform some core functions. They're technically referred to as System Apps. One of the major advantage of this "System Apps" is that they're immune and cannot be uninstalled if your device isn't rooted and if perhaps you mistakenly or willingly drag out some of this apps, you're surely going to end up with a bricked device. The Google playstore offers tons of user application which can be easily uninstalled whenever we desire and thus those apps does not enjoy system privilege and are been refered to as user apps.

However converting a user apps into system app can actually be a piece of cake if only you've the right "recipe". There are numerous reasons why you'd want to convert some of your user app to system app especially those that comes in handy. Thus in this article we're going to unveil the best way to convert user app or third party apps to system apps on android. There's no doubt that apps like titanium backup pro and others can help perform this task gullibly, but we're going to use es file explorer and lucky patcher which is more better, easy and classic.

Requirements

  • Battery Charged Up To 50%

Convert User Apps To System Apps On Android

Before we dive into the main article you've to make sure you've the above mentioned requirements ready in other to stay in track. Now open Es file explorer from your app drawer and swipe from the left to open the navigation drawer.

Tap on the "Tool" option and a drop down menu will appear unveiling more options you can access (I.e if you're still using the old version of es file). Simply scroll down and locate the "Root Explorer" option, then toggle it ON. You might get a prompt from the SuperUser app to grant root access to the app, simply hit Yes if you're prompted.


Now navigate back to the homepage and this time, locate and tap on Device (the / icon). From there, you will see some folders which are of essence. Ignore them and simply click on "Data" and then "App" to access your installed apps.

Here you will find the list of all the user or third party apps on your device. Next long press on the app you want to convert as system app. Once selected, tap on the three horizontal dots on the upper right side of the screen and select the"Cut"option.


Next navigate back to the homepage and hit the "/" device option. Now tap on the "System" folder followed by the "App" folder.  You will see the list of all the system apps on your device. All you've to do is to paste the app you copied earlier in this location.

Once done, you've to grant the app some certain permission in other to ensure proper functionality. To achieve this, long press on the app and tap on the three horizontal dots on the upper right side of the screen then select the "Properties" option.

Now you've some tinkering to do here. To dive further, tap on the "Change" option which is next to Permission. Then enable all the check boxes for the Read, Write and Execute permission. That's it. You've granted the apk file system permission.


Once you're through, simply reboot your device and the app will now be installed as a system app. To verify this, navigate to settings and tap on "Apps" then locate the app you converted earlier. This time the uninstall option won't be there. Which confirms you did things as prescribed.

Alternative Method

We won't exaggerate this procedure as we're going to use lucky patcher to convert your preferred user apps to system apps on android. This method is easy but I strongly recommend it only for advanced users who knows how lucky patcher works.

First and foremost download Lucky patcher. Locate the app from your device app drawer and tap on it to open. It might ask for root permission so grant it.


Make sure you've the app ticked via xposed modules option (optional). Now on first launch, you will be presented with a nice interface with all your apps listed. Next navigate through and select the app you want to convert to system app. Then from the drop down option that will appear, select "Tools".


We're almost through here, now locate the option Move to /System/App and tap on it. Next wait for a few seconds and the app will automatically be moved to system apps.


Alternative Method 2

Titanium backup can also painlessly aid you to convert any user app to system app. The app works just like lucky patcher and thus if the es file explorer method proves to be a bit lengthy, then titanium backup can be your alternative for this procedure.

First and foremost ​Install Titanium backup from the Google PlayStore. Then locate the app from your app drawer and tap to open then make sure you allow all the necessary Root access. Next open the Backup and Restore Tab, and Search the application you want to “convert to system app”


Hold and press the desired App icon and a pop up menu will appear. Then in that menu choose the last option which is convert to system app. and that’s it wait for titanium backup to complete the process and then restart your device.

Final Words

The three procedures can come in handy when you're in haste. While the lucky patcher and titanum backup method proved to be more simple, you also shouldn't ignore the es file explorer method. Once you've converted a user app to system app, it won't be deleted even if you format your device. That's one of the major advantage so I urge you to only convert apps that are of essence to you since the system storage has limit.
How To Enable YouTube Background Playback On Android

How To Enable YouTube Background Playback On Android


Get YouTube Red Background Playback for free on every android device including Nougats, marshmallows, lollipop and KitKat.

YouTube is the most popular video sharing website that has come to stay. While the platform serves not only as where you can enjoy and stream your favorite videos, there are also tons of good quality music that you can stream online over there. Billions of people's uses YouTube to watch there favorite trailers, albums and captivating videos in other to kill time. However there are certain limitations which can prove to be a hindrance while trying to unleash YouTube capabilities and experience. By default, the official YouTube application does not allow you to play YouTube videos in the background or via the notification panel on your android device. But there's a catch here!.
Also Read: Top 10 Most Useful UC Browser Tips And Tricks For Android.
The YouTube red which was introduced by Google comes loaded with extensive features everyone would love to have. While using the YouTube red, you can painlessly enable background playback and ad-free video streaming. However this feature is not available for Free. But you can enjoy it if only you’re willing to pay an absurd amount of $9.99 per month for a YouTube Red subscription. Unfortunately, YouTube Red is available only in the US and other specified country's such as Korea and if you are from other country you’ll need some procedure to help you enable the Youtube background playback totally for Free.

Yes! Free.. The YouTube red doesn't offer much value to the amount it’s charging but there's a way to get this feature without paying a dime. If perhaps you have a YouTube Red subscription, simply go to the app Menu->Settings->Background Play and select “Always on” to always play videos from the background. Now if you're running android KitKat, lollipop and marshmallow, you can enable this feature by using an xposed module. However it's too bad that xposed team hasn't extended it's support on android Nougat device. But there's also a way to enable the YouTube background playback on nougat users.

Enable YouTube Background Playback On Android Kitkat, Lollipop and Marshmallows

This procedure will strictly be for the android device running the above stated versions. Thus if you're using the android 7.0 Nougat update, simple scroll down and read the brief steps to enable this feature on your device. We're going to use an xposed module to achieve our aim here.

Requirements

  • Unknown Source Enabled Via Settings

Install YouTube Background Playback

YouTube background playback is an xposed module that enables background playback in YouTube and playback control via notification. Thus to begin with, head over to the xposed framework on your device and jump into the "Download" section. Now search for "YouTube Background Playback" and hit on the result.


From there, painlessly swipe your device screen over to the "Version tab". Then hit the " Download " button. Make sure you download the latest version of the module, because when Google updates the YouTube red, there's a likelihood that you need to update the module to to the latest version in other to stay updated with the newest features. Now once the download is completed, simply "Install" it.


Once the installation process is "Done", you'll get a notification from xposed informing you that the module hasn't been activated yet and that a reboot is needed. So enable it and perform a reboot or rather navigate back to xposed installer and tap on "Modules". Then tick the YouTube background playback option and navigate back again to the homescreen. Now tap the "Framework" section and perform a soft reboot in other to activate the module.


Play YouTube Videos In The Background Or Notification Without Ads

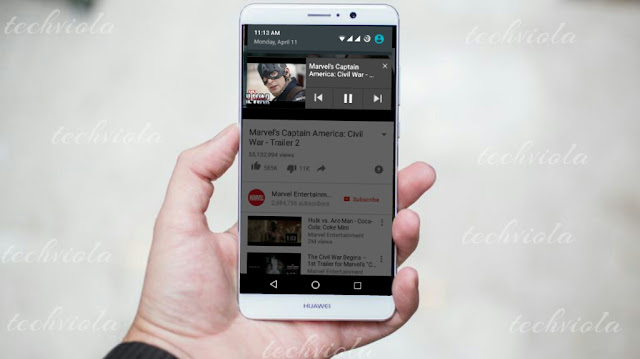
Now once your android device has rebooted successfully, there actually will be no further setup here. Thus from now on, whenever you're playing a YouTube video, you'll notice that there aren't any ads. And on top of that, if you minimize yourandroid device, the audio or video playback will continue in the background and you'll see it also on the notification panel without any hassle.


Enable YouTube Background Playback On Android 7.0 Nougat

While the xposed installer team over at XDA developers are still trying to extend support for xposed on android nougat, there's no need waiting for them since you can enable the YouTube background playback on your Nougat device by patching the official YouTube app on your android. Follow the below procedure..

Requirements

  • Unknown Source Enabled Via Settings

Install Lucky Patcher

First download the Lucky Patcher app on your android device from the link we've provided above and install it. Now you need to enable “Unknown Sources” from your device settings before installing the app. Once installed, locate and launch the app from your app drawer, and a popup will appear requesting for SuperSU permissions. Grant it.


In the Lucky Patcher app, you’ll see the list of installed apps on your device. Now select the “YouTube” app from the list and hit the “Open menu of patches” option. You might get a system application warning if YouTube is installed as a system app, so hit "Yes" if prompted. Then tap on the “Custom patch” and hit “Apply” to patch the YouTube app on your device.


It’ll take some time to patch the app, so wait patiently until you see a success message. That’s it! You’ve patched the YouTube app. You can also apply other patches which can help to remove ads on the YouTube app. Thus explore lucky patcher and you will see this option available to be tinkered.


Play YouTube Music In The Background Or Notification Without Ads

Now, open the YouTube app and play a song or video, then hit the home button to minimize the app. You’ll soon see a “YouTube background playback” notification in the notification bar with options such as pause, play, previous, and next buttons. Now you can enjoy your favorite music or videos on YouTube in the background without paying a a dime as subscription fee.


Final Words

The YouTube Red has proved to be a feature worth upgrading. Imagine playing a song and performing other various task on your android device without worrying of any buffering. This feature is definitely a "dope" and is worth having. By following either of the above guides, you can now play all your favorite YouTube videos or music in the background of your android device.
How To Get The Android Nougats New Emojis On Your Device

How To Get The Android Nougats New Emojis On Your Device

How To Get The Android Nougats New Emojis On Your Device

Emojis are technically the best and the most convenient way to interact or communicate with our recipients. They can aid you say everything there's to say without having to type them individually. When the new Apple smartphones where unveiled, many android users probably saw how eye-catching, classic and real the emojis integrated into it was unlike those "crap" the android jellybeans and KitKat brought. However Google responded quickly to this impending issue and decided to add a "Human head or style" classic emojis Unicode 9.0 on the new android 7.0 Nougat.
Also Read: How To Get Android 7.0 Nougats New Navigation Keys On Your Device Right Now.
Now while the new emoji updates may soon start to roll out on probably other versions of android smartphone users, waiting can be dangerous too. Thus having known how eagerly people tends to be anticipating for this feature, the geeks over there at Gadget Hacks decided to create a flashable ZIP that will bring Nougat's new emojis to almost any device.  As they've stated, these emojis were pulled directly from the latest Nougat preview build, and they replace your existing emojis on a system level, so they're as up-to-date as it gets, and they'll work with any app.

Requirements

  • Android 5.0 and Above
  • A Custom Recovery Installed

Procedures

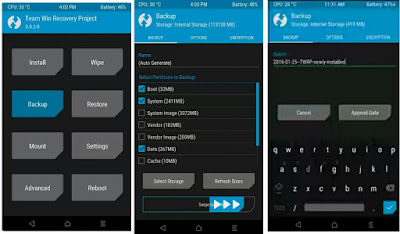
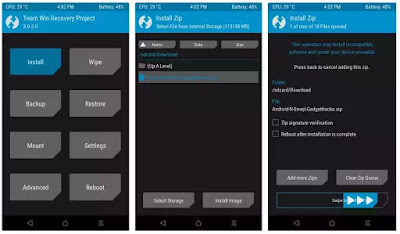
Before we dive into the main article, you probably need to meet up with the above requirements. Thus once you've download the android nougats emoji pack, make sure you place it in a directory on your SD card where you will easily see it later on. Also endeavor to flash a custom recovery. If perhaps you already have the TWRP recovery installed, the first thing you should do is create a full NANDroid backup. So tap the "Backup" button, then leave everything selected as it is and swipe the slider at the bottom of the screen

How To Get The Android Nougats New Emojis On Your Device

Now once you have downloaded the zip file to your device, reboot into recovery mode and on the main screen of your custom recovery menu, tap on the “Install” button and navigate to the “Download” folder. Then locate and select the Emoji.zip file from the directory you placed it earlier on. Next tap on “Install Image” and Swipe to begin the installation process. Once the installation process is completed, tap on “Reboot System” to restart your android device.

How To Get The Android Nougats New Emojis On Your Device

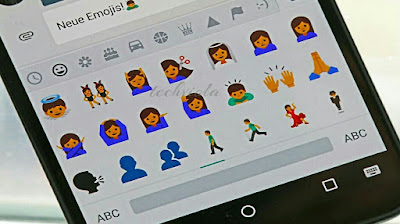
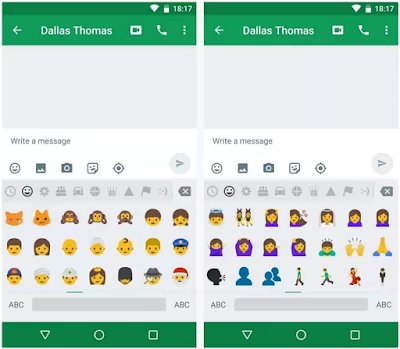
Once your android device has rebooted, the newly applied Emojis will probably be smiling at you. You can now simply open your Google keyboard and switch to the emoji section to see it working. Also the newly applied Emojis will also appear, along with several new and unique characters.

How To Get The Android Nougats New Emojis On Your Device

Bonus Tip: If perhaps you already have the new Google Keyboard installed prior to flashing this emoji pack, you will need to clear the cache and data of the Keyboard before the new emojis will be visible or accessible. This method works on all android device once you're rooted and running android version 5.0... But make sure you've created a NANDroid Backup.as stated earlier on.

Source: wonderhowto.com
How To Lock Individual Apps On Android With Your Face

How To Lock Individual Apps On Android With Your Face


Android brings a huge catalogue of tremendous apps and probably games which we do like to lock sometimes from our children or intruders. By default our smartphone brings a pretty fine security options via the settings, however locking our device screen to safeguard privacy will kinda seem inconvenient. Perhaps you've probably tried some of the best app locks for android which mostly brings a Password, PIN, Fingerprint, Pattern or Gesture unlock option that can easily be manipulated or breeched in by an expert or intruder.

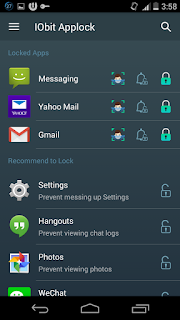
Now what if there's a way to securely lock all the apps on your smartphone with just your face? Well the answer to this question will certainly be "Yes". While doing a "routine" on the web, i stumbled upon an interesting app known as "IObit AppLock" which uses an AI and facial recognition tech as one of its security measures. Other than this, IObit Applock also protect your privacy with pattern and PIN password. Overall, IObit makes unlocking your apps as easy as looking at your phone. With that said already, let's have a glimpse on how the app works.

Install IObit AppLock

IObit AppLock is a free, simple and easy to use app which offers tons of essential features. Now to get this one going, head over to the Google play store and install IObit AppLock - Face Lock. 


Once the installation process is completed, open the app and you'll be required to create a password. Which you can either use the "Pattern" or "PIN" code option. Next a pop-up will appear, tap "Bind" and enter your email at the next screen. This will enable you to retrieve your password once you've forgotten it.


Enable Device Administrator

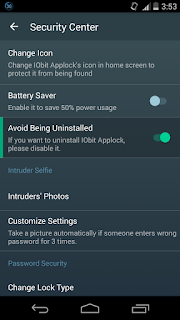
This however is one of the essential features IObit AppLock brings. Once you've enabled the "Device Administrator"option, it will ensure that someone else does not uninstall the app. To achieve this, head over to the app side menu and tap on "Security Center". Next toggle ON "Avoid Being Uninstalled" and on the next screen, hit "Activate". Now this option will need to be disabled by the owner before IObit AppLock can be uninstalled.

IObit AppLock - Face Lock

Lock Individual Apps and Enable Face Lock

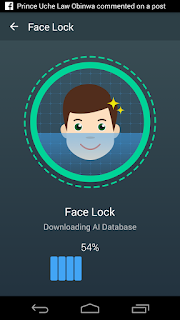
Now navigate to IObit AppLock main screen and select which app you want to lock by tapping the "Key" icon. Next swipe down to refresh the app list. From here you'll see three icons next to each locked app. Simply tap the 1st icon and allow IObit AppLock to download the AI Database.
IObit AppLock - Face Lock

Now you've to let IObit AppLock scan your face. Simply fill your face into the circle and ensure adequate light. When you're done, navigate back and enable "face locking" on other apps by tapping the first icon as stated earlier on.

IObit AppLock - Face Lock

Unlock Apps With Your Face

Once you're through, you can open one of your locked app and you will be greeted with a face unlock screen. To unlock the app, fill your face in the circle and ensure adequate light then wait a second or two. However if your face can't be detected or if perhaps an intruder tries to access the app, IObit AppLock will activate to the default pattern or PIN. Once the process repeats it's self twice or more, you'll even get an email with the face of the intruder attached to it.


Final Words

Overall, IObit AppLock is pretty generous and comes in handy. You can even customize the app and change it's icon via the "Security Center" option which will prevent it from been found by any intruder. Apart from this, the app brings tons of features and a battery saver option. Thus it's a Must Have as it proves to be one of the best app that can conveniently safeguard your data from unauthorized users.
How To Convert A Regular Or Scanned PDF To Excel

How To Convert A Regular Or Scanned PDF To Excel


Being used in a tremendously frequent fashion by a wide range of business professionals, Microsoft Excel is without any doubt one of the most sought after programs in the world. This comes as no surprise, because the number of ways it can be used is practically limitless, and therefore accountants, bankers, marketers, analysts, bookkeepers and all other sorts of occupations rely on it on a regular basis.

The sharing of Excel documents on the other hand is a totally different subject. Because each operating system has its own individual way of interpreting the formatting of the file, the possibility of issues emerging from sending a file from one operating system to another differing one can be catastrophic, rendering the file utterly unviewable by the recipient. This type of problem can also occur if the devices are different, for instance when a user sends a file from a computer to a smartphone.

In order to avoid such complications, the sender should always convert the Excel file to PDF prior to sending, because this particular file format has a unique way of formatting the document, making it viewable everywhere, no matter what type of operating system or device is in question. In Excel’s case, this can be achieved directly from the program itself, located in the “Save As” subsection.

But just as the PDF is supremely useful for making sure that the file you were trying to get across reaches its destination, it can also create some problems for the recipient, that is if he desires to make any kind of change to it. Once the PDF is created from the original Excel document, it becomes a read-only file, and to make it editable once more the user needs to convert the PDF back to the native Excel file, but we’ll get to that later in the article.

Another area that causes distress for users are scanned PDF documents. These types of documents are even more difficult to convert, because the software has to analyze each character in the file individually. This type of identification is called Optical Character Recognition, and it is indispensable when it comes to scanned documents.

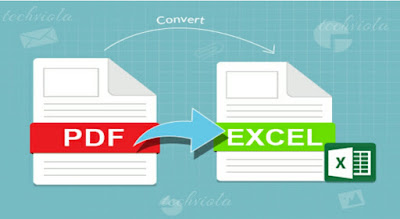
We’ve found a splendid online tool that is able to convert both regular and scanned PDFs. The outlay of the website is very simple and easy to navigate through, and the most important thing is that it’s absolutely free, which is a real rarity when it comes to conversion tools that offer good results. All the tables from the PDF will be accurately transformed back to the editable .xlsx format in under one minute for files that aren’t too massive. For these larger files, the process lasts a bit longer, but nothing too excruciating.

Also, an important feature of this tool is that it doesn’t ask for any type of personal info, nor any log-in details, which really speeds up the entire ordeal. So let’s show you how to use it.

Convert PDF To Excel

When you’re on PDF to Excel website, the first thing needed to be done is uploading the document. That can be done either from your device/computer, or directly from the cloud with Google Drive, OneDrive and Dropbox.


The conversion will auto-start as soon as you upload the file, and once the process is complete, the download button will present itself.


It’s very simple as we previously said, so it shouldn’t take too much of your time, leaving you with more space to deal with the real task at hand.

Final Words

Things such as this doesn't come in a platter of gold. PDF to Excel can painlessly convert ANY native or scanned PDF file to excel without the need for further formatting. The output however will be an exact recognition of the spreadsheet. In this case, all the tables trapped in the PDF will be extracted accurately. The rows and columns structure will be the same as in the original file, but this time, it will be fully editable and ready for reuse. Overall, PDF to excel is fast, easy and reliable.